Showing posts with label throwdown. Show all posts

Wednesday, April 22, 2009

Throwdown::No-Knead Bread

The Cook's Illustrated No-Knead Bread on the left with some Whole-Wheat Flax loaves

As promised, here is the no-knead bread post. As I mentioned earlier, the no-knead trend has been gaining a lot of steam lately and has been credited with getting a lot of people over their fear of yeast. And frankly, the credit is earned. It really is quite easy and it really is quite good.

The bread is a pretty straight forward flour, water, salt, yeast french bready type deal. It has a nice crisp crust without being overly chewy, a soft, moist, open crumb and it just tastes good. Both recipes I made had a touch of sweetness to them because they are both all white flour breads. The first no-knead bread we tried was the Jim Lahey/Mark Bittman bread as published in the New York Times. We pitted that against the Cook's Illustrated "Almost No-Knead Bread" but I skipped their kneading stage, so we can call it a true Throwdown::No-Knead Bread.

Both breads use the same long fermentation technique. You mix up all the ingredients into a shaggy dough, cover it, and let it sit for 12-18 hours. Time it so you can wait the whole 18 hours, it makes a difference. The dough is then folded together (watch this video to get a sense of what the folding looks like - and a walk through of the whole process) a few time, left to rest, shaped, rested, and baked in a preheat dutch oven. The first have of baking is covered, so the moist dough in a closed environment creates it's own steam with contributes to the great crumb and crust.

The Lahey/Bittman bread is a straight up dough of flour, water, yeast, and salt. The Cook's Illustrated version gets tricky by adding a bit of lager and a touch of vinegar to get the yeast all excited. Neither one takes much hands on time. A few minutes to mix the ingredients, a minute to fold, another minute to shape. You have to remember to preheat the dutch oven. It needs to be screaming hot so the bread steams and doesn't stick.

At the end of the day, we decided we liked the Cook's Illustrated version better. The beer and vinegar just gave it a slightly more interesting dimension. Both were very enjoyable and I would make both again. In fact I know I will end up making them quite often. It is great dinner bread with soup, or as an appetizer with cheese etc. Very versatile and delicious.

Lahey/Bittman No-Knead Bread

Adapted from Jim Lahey, Sullivan Street Bakery
Time: About 1½ hours plus 14 to 20 hours’ rising

3 cups all-purpose or bread flour, more for dusting
¼ teaspoon instant yeast
1¼ teaspoons salt
Cornmeal or wheat bran as needed.

1. In a large bowl combine flour, yeast and salt. Add 1 5/8 cups water, and stir until blended; dough will be shaggy and sticky. Cover bowl with plastic wrap. Let dough rest at least 12 hours, preferably about 18, at warm room temperature, about 70 degrees.

2. Dough is ready when its surface is dotted with bubbles. Lightly flour a work surface and place dough on it; sprinkle it with a little more flour and fold it over on itself once or twice. Cover loosely with plastic wrap and let rest about 15 minutes.

3. Using just enough flour to keep dough from sticking to work surface or to your fingers, gently and quickly shape dough into a ball. Generously coat a cotton towel (not terry cloth) with flour, wheat bran or cornmeal; put dough seam side down on towel and dust with more flour, bran or cornmeal. Cover with another cotton towel and let rise for about 2 hours. When it is ready, dough will be more than double in size and will not readily spring back when poked with a finger.

4. At least a half-hour before dough is ready, heat oven to 450 degrees. Put a 6- to 8-quart heavy covered pot (cast iron, enamel, Pyrex or ceramic) in oven as it heats. When dough is ready, carefully remove pot from oven. Slide your hand under towel and turn dough over into pot, seam side up; it may look like a mess, but that is O.K. Shake pan once or twice if dough is unevenly distributed; it will straighten out as it bakes. Cover with lid and bake 30 minutes, then remove lid and bake another 15 to 30 minutes, until loaf is beautifully browned. Cool on a rack.

Yield: One 1½-pound loaf.

Nice crumb, but not as much rise as the Cook's Illustrated recipe


Cook's Illustrated Almost No-Knead Bread

3 cups (15 ounces) unbleached all-purpose flour, plus additional for dusting work surface
1/4 teaspoon instant yeast
1 1/2 teaspoons table salt
3/4 cup plus 2 tablespoons water (7 ounces) at room temperature
1/4 cup plus 2 tablespoons (3 ounces) mild-flavored lager (I used a Black Lager and it worked great - not exactly mild)
1 tablespoon white vinegar

Don't be afraid to bake it until the edges get pretty dark, pale, anemic looking bread is just sad

1. Whisk flour, yeast and salt in large bowl. Add water, beer and vinegar. Using rubber spatula, fold mixture, scraping up dry flour from bottom of bowl until shaggy ball forms. Cover bowl with plastic wrap and let sit at room temperature for 8 to 18 hours.


2. Lay 12- to 18-inch sheet of parchment paper inside 10-inch skillet and spray with nonstick cooking spray. Transfer dough to lightly floured work surface and knead 10 to 15 times. Shape dough into ball by pulling edges into middle. Transfer dough, seam-side down, to parchment-lined skillet and spray surface of dough with nonstick cooking spray. Cover loosely with plastic wrap and let rise at room temperature until dough has doubled in size and does not readily spring back when poked with finger, about 2 hours. [Okay, this part I did totally different. After step one, dump the dough out onto a floured surface and fold several times the same way as with the Lahey/Bittman bread and transfer to a flour covered cloth (not terry cloth). You don't need the parchment paper, skillet, or cooking spray if you flour the cloth well.]


3. About 30 minutes before baking, adjust oven rack to lowest position (I left it in the middle), place 6- to 8-quart heavy-bottomed Dutch oven (with lid) on rack, and heat oven to 500 degrees. Lightly flour top of dough and, using razor blade or sharp knife, make one 6-inch long, 1/2-inch deep slit along top of dough. Carefully remove pot from oven and remove lid. Pick up dough by lifting parchment overhang and lower into pot (let any excess parchment hang over pot edge). [Since I didn't use the parchment paper, I just gently lifted the dough and dropped it into the pot - be careful, it's very hot!] Cover pot and place in oven. Reduce oven temperature to 425 degrees and bake covered for 30 minutes. Remove lid and continue to bake until loaf is deep brown and instant-read thermometer inserted into center registers 210 degrees, 20 to 30 minutes longer. Carefully remove bread from pot; transfer to wire rack and cool to room temperature, about 2 hours.

Beautiful, light, moist, open crumb and a thin crackly crust - a delightful bread all around
Submitted to YeastSpotting at Wild Yeast

Tuesday, February 3, 2009

A Personal Ciabatta Throwdown


I challenged myself to a one man Throwdown::Ciabatta. I have been wanting to experiment with breads beyond the realm of Artisan Breads in Five Minutes a Day. Don't get me wrong, we still love ABi5MaD, and have a loaf of semolina in the fridge right now. I did want to try some more traditional methods however, and expand my bread baking arsenal.

I decided I would dive right into a really wet dough bread - Ciabatta. Because it has such a high water to flour ratio (hydration level) Ciabatta can be difficult to work with and doesn't take to the standard knead-the-heck-out-of-it that a bagel or sandwich dough will.

I've had Peter Reinhart's Bread Baker's Assistant for some time now, and I have made the bagel and pizza dough out of it, and I will admit, they didn't come out great for me. But because it is such a revered bread baking resource, I wanted to give it another shot. I decided I would make the Ciabatta out of BBA and also a "quick" version I found on one of my favorite bread resource sites, The Fresh Loaf.

I followed both recipes exactly, weighing my ingredients and timing my rests, fermentations etc. I made the quick version first and the results were fantastic. Great flavor, perfect crumb with large, shiny, irregular air pockets, and just the right amount of moistness. I was feeling good about my Ciabatta skills after that. The whole thing comes together in a few hours all in one day.

Great crumb, great bread, using Jason's quick version


So when I moved on to the BBA recipe that start by building a poolish that ferments and then cold retards overnight, I'm thinking - man, this thing is going to be awesome. After following the directions quite faithfully as far as I can tell, the result - eh. It tasted okay, texture was fine for a basic soft white bread, no irregular holes, no moist, saturated crumb. On the one hand, I was definitely disappointed, on the other hand, yay! the quick version rocks!

The less successful Ciabatta from BBA


I may yet give the BBA version another shot, making some modifications along the way. After all, bread baking is not about faithfully following printed instructions, but understanding a method, an idea, and understanding the nature of the dough and working with it and modifying as necessary.

But for those of you who have put off making a ciabatta or high hydration baguette, I say give Jason's Quick Ciabatta recipe a try and I think you will be very pleased.

Jason's Quick Ciabbata

Variaton 1
500g bread flour
475g (~2 cups) water
2 tsp. yeast
15g salt

Varation 2 (Semolina)350g bread flour
150g semolina flour
475-485g (~2cups) water
2tsp. yeast
15g salt

In Kitchen Aid style mixer: Mix all ingredients roughly till combined with paddle, let it rest for 10 minutes.

With the paddle (I prefer the hook to prevent the dough from crawling into the guts of the mixer), beat the living hell out of the batter, it will start out like pancake batter but in anywhere from 10 to 30 minutes it will set up and work like a very sticky dough. if it starts climbing too soon, then switch to the hook. You'll know it's done when it separates from the side of the bowl and starts to climb up your hook/paddle and just coming off the bottom of the bowl. I mean this literally about the climbing, i once didn't pay attention and it climbed up my paddle into the greasy inner workings of the mixer. It was not pretty! Anyway, it will definitely pass the windowpane test.

Place into a well oiled container and let it triple! it must triple! For me this takes about 2.5 hours

Empty on to a floured counter (scrape if you must, however you gotta get the gloop out), cut into 3 or 4 pieces. Spray with oil and dust with lots o' flour. Let them proof for about 45 minutes, which gives you enough time to crank that oven up to 500F.

After 45 minutes or so the loaves should be puffy and wobbly, now it's iron fist, velvet glove time. Pick up and stretch into your final ciabatta shape (~10" oblong rectangle) and flip them upside down (this redistributes the bubbles, so you get even bubbles throughout), and onto parchment or a heavily floured peel. Try to do it in one motion and be gentle, it might look like you've ruined them completely, but the oven spring is immense on these things.

Bake at 500F until they are 205F in the center (about 15-20 minutes), rotating 180 degrees half way through. Some people like to turn the oven down to 450F after 10 minutes, but whatever floats your boat. I usually bake in 2 batches.


Monday, September 8, 2008

Throwdown :: Challah


Before I give away the results, let me just say that the first official Throwdown:: was a blast. I of course enjoyed the baking, but I especially enjoyed the friendly competition with my good friend Cat and the competitive judging/eating/excuse to get together with friends. I can be a bit on the competitive side, so I am often cautious about competing in events if I don’t think I have a very good chance of winning. I know that’s ridiculous, but it is the truth. It is even the case when I am “competing” against myself – as in trying a new, complicated recipe. I have been known not to try if I feared “defeat”. (This is why Daring Bakers is good for me – forces me, with the threat of public shame to attempt new things that I certainly would not try on my own.)

That said, I had no real fear of losing to Cat – no, not because I thought I was totally going to win – but because I know Cat is a great baker and a wonderful person, so who could be upset losing to those qualifications? Now, that being said (here comes that obnoxious competitive side) let me note that I was in fact the only Jew present at this competition that was, afterall, about Challah-- you know, that traditional braided bread served at Jewish holidays and on the Sabbath?

All hedging aside, and without further ado…I got trounced. The Earhearts, Heath, and my very own wife, all voted for Cat’s Challah - which was quite delicious. Congratulations Cat on a complete domination of what will hopefully be the first of many Throwdowns:: !

When we compared recipes a few things stood out. Her recipe uses butter instead of oil (which of course tastes better, but doesn’t work if you’re having a fleishig meal), and had several more eggs and more sugar (I actually used honey). The increased eggyness and sweetness gave the finished product a very Brioche texture and taste. And who can complain about, or for that matter, vote against, Brioche? I might argue that my bread was a more classical Challah, but there is no way to argue with the fact that Cat easily won this taste test.

After all that, I imagine you would prefer that I list Cat’s recipe instead of mine (she used the recipe from William Sonoma’s Essentials of Baking ), but I'm including the recipe I used as what I still believe is a great recipe for a traditional Challah. The recipe is from the Moosewood series of cookbooks from the famous vegetarian restaurant by the same name in Ithaca, NY. This particular recipe came from Still Life with Menu and you can actually find the recipe by using Google’s book search, so I won’t reprint it here – but I do highly recommend purchasing the cookbook.

The recipe makes two substantial loaves of challah, and ends up incorporating nearly 9 cups of AP flour. Needless to say, this should be kneaded by hand, and not by the woefully inadequate (only for this recipe, I didn’t mean it, really, I love you) 5 quart KitchenAid stand mixer. However, although I fear defeat, I do occasionally like to live on the edge, so I tend to push the mixer's limits a bit. As you continually add flour, the dough starts to taunt the KitchenAid…


…until finally, the dough wins, and you are forced to finish kneading by hand. Something I actually quite enjoy doing, which then begs the question, why did I bother overfilling the stand mixer in the first place?


I have not perfected my braiding skills yet, so I continue to experiment with different techniques. I read somewhere about starting from the middle and braiding out to the two sides in order to get a more uniform shape, but I ended up with an odd, stretched band across the middle. The other loaf was just a little sloppy on my part – too much handling while trying to move from counter to baking sheet, then deciding it should go on a different baking sheet, etc.


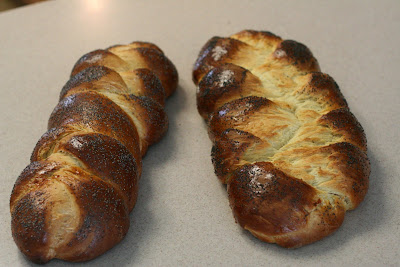
My guess, is that the softer texture of Cat’s loaf (on the right) allowed for a little more sideways slide while it baked. Regardless, this here was one fine night of carb loading deliciousness.


We did our best to keep the taste test blind. Torn up, the breads looked enough alike that we were able to plate them on different colored dishes and then have each person taste them side by side.


We did two rounds, and a few voters changed votes in between rounds, but when the vote was made, I was a 4-0 loser. In the end, I had fun baking, I had fun hanging out with friends, and I am looking forward to our next challenge, Throwdown::Chocolate Cake, also with Cat…stay tuned!

Wednesday, July 30, 2008

Throwdown - Challah

It's official, the first throwdown is on. Cat and I will be going head to head in a Challah challenge. Results to follow - although we've put it off until after H's b-day.

You know what this means Erica, apple pie throwdown here we come!